Translate

Sunday, June 23, 2024

కొత్తగా యూట్యూబ్ ఛానెల్ పెట్టారా? ఫ్రీ ఇమేజ్ లు, మ్యూజిక్ ట్రాక్స్ అందించే వెబ్ సైట్లు ఇవే!


కొత్తగా యూట్యూబ్ ఛానెల్ పెట్టారా? ఫ్రీ ఇమేజ్ లు, మ్యూజిక్ ట్రాక్స్ అందించే వెబ్ సైట్లు ఇవే!

ప్రస్తుతం అంతా సోషల్ మీడియా(Social media) యుగం నడుస్తోంది. పొద్దున్నే నిద్రలేచిన దగ్గర నుంచి పడుకునే వరకు మన జీవనవిధానాన్ని ఓ రకంగా సోషల్ మీడియా డిసైడ్ చేస్తుందనే చెప్పవచ్చు.

కొంతమందికి రోజులో ఒక్క నిమిషం అయినా సోషల్ మీడియాలో గడపాల్పిందే..లేకుంటే ఏదో కోల్పోయిన భాధ పడుతుంటారు. అయితే మీరు కూడా మీరు సోషల్ మీడియాలో చాలా యాక్టివ్​గా ఉంటారా? సోషల్ మీడియా ఇన్​ఫ్లూయెన్సర్ గా(Social Media Influencer)మారాలనుకుంటున్నారా? అయితే కొన్ని ముఖ్య విషయాలను గుర్తుంచుకోవాలి. వాటిలో ఒక ముఖ్యమైనది కాపీరైట్ సమస్య. సోషల్ మీడియాలో ఎలాంటి కాపీ రైట్(Copy right) స్ట్రైక్​ పడకుండా ఉండాలంటే, ప్రీమియం ఇమేజ్​ లు, ఆడియో ట్రాక్స్, వీడియోలు వాడాల్సి ఉంటుంది. ఇందుకోసం పెద్ద మొత్తంలోనే డబ్బు ఖర్చు చేయాల్సి ఉంటుంది అయితే ఒక్క రూపాయి కూడా ఖర్చు చేయకుండా పూర్తి ఉచితంగా ఫొటోలు, వీడియోలు, మ్యూజిక్​ ఫైల్స్​ అందించే వెబ్​సైట్స్ చాలానే ఉన్నాయి. వాటిల్లో కొన్ని ముఖ్యమైనవి ఇప్పుడు చూద్దాం.

ఉచిత హై క్వాలిటీ ఇమేజ్ లు,వీడియోల కోసం వెబ్ సైట్లు

Pixabay(పిక్సా బే) : ఈ వెబ్ సైట్ లో చాలా వరకు ఫ్రీ కంటెంట్ ఉంటుంది. ఫొటోలు, జిఫ్ ఫైల్స్​, మ్యూజిక్, సౌండ్​ ఎఫెక్ట్స్​, వెక్టార్స్, వీడియోస్ అన్నీ ఉంటాయి. వీటిని ఉచితంగా వాడుకోవచ్చు.

Pexels(పిక్సెల్స్) : ఈ వెబ్​సైట్ లో ఫ్రీ ఫొటోలు, 4కె స్టాక్ వీడియోలు, బ్యాక్​గ్రౌండ్​ ఇమేజ్​లు లభిస్తాయి. వీటిని పూర్తి ఉచితంగా వాడుకోవచ్చు. అయితే కొన్ని ఇమేజ్​లకు క్రెడిట్ ఇవ్వాలి..కొన్నింటికి అది కూడా అవసరం ఉండదు.

Freepik(ఫ్రీ పిక్) : ఇందులో ఫొటోలు, వీడియోలు, టెంప్లెట్స్,ఐకాన్​లు, పీఎస్​డీలు, 3డీ ఫొటోలు ఉంటాయి. వీటిని ఉచితంగా వాడుకోవచ్చు.

Freerange(ఫ్రీ రేంజ్) : ఇందులో ఫ్రీ స్టాక్ ఫొటోస్, ఇల్లస్ట్రేషన్స్​ ఉంటాయి. దీనిలో పాపులర్​ ఫొటోస్ అనే విభాగం ఉంది. దీంట్లో హైక్వాలిటీ ఫొటోలు చాలా ఉంటాయి. వాటిని ఫ్రీగా వాడుకోవచ్చు.

Unsplash(అన్ స్ప్లాష్) : ఇందులో రాయల్టీ ఫ్రీ స్టాక్ ఫొటోలు ఉంటాయి. స్ట్రీట్​ ఫొటోగ్రఫీ, ఫ్యాషన్, బ్యూటీ, వాల్​పేపర్స్​, 3డీ రెండర్స్, టెక్స్​చర్స్ విభాగాలకు చెందిన భిన్నమైన ఫొటోలు, ఇల్లస్ట్రేషన్లు ఉంటాయి. వీటిని ఫ్రీగా ఉపయోగించుకోవచ్చు.

ఫ్రీ మ్యూజిక్ లేదా ఆడియా ట్రాక్ ల కోసం వెబ్ సైట్లు

Bensound(బెన్ సౌండ్) : ఇది వీడియో క్రియేటర్లకు బాగా ఉపయోగపడే వెబ్​సైట్. ఇందులో ఎంతో మంది సంగీత కళాకారులు రూపొందించిన లేటెస్ట్ మ్యూజిట్ ట్రాక్స్ ఉంటాయి. వాళ్లకు క్రెడిట్ ఇచ్చి, ఆడియో ట్రాక్స్​ను ఫ్రీగా మీ వీడియోల కోసం వాడుకోవచ్చు.

YouTube Audio Library(యూట్యూబ్ ఆడియో లైబ్రరీ): కంటెంట్ క్రియేటర్ల కోసం యూట్యూబ్ ప్రత్యేకంగా ఆడియో లైబ్రరీని తీసుకువచ్చింది. ఇందులో రాయల్టీ ఫ్రీ మ్యూజిక్, పబ్లిక్ డొమైన్​, క్రియేటివ్ కామన్స్ విభాగాలకు చెందిన అనేక ఆడియో ఫైల్స్ ఉంటాయి. అయితే కొన్నింటికి క్రెడిట్స్ ఇవ్వాల్సి వస్తుంది. ​

Free Music Archive(యూట్యూబ్ మ్యూజిక్ ఆర్కైవ్) : ఇందులో రాయల్టీ ఫ్రీ మ్యూజిక్ లభిస్తుంది. క్రియేటివ్​ కామన్స్​ లైసెన్స్​ కింద వీటిని వాడుకోవచ్చు.

SoundCloud : దీంట్లో ఉచితం, పెయిడ్​ సబ్​స్క్రిప్షన్ రెండూ ఉన్నాయి. మీరు ఇప్పుడిప్పుడే సోషల్ మీడియాలోకి ఎంట్రీ ఇచ్చినట్లయితే ఫ్రీ సబ్​స్క్రిప్షన్ తీసుకుని ఆడియో ట్రాక్స్ ఉపయోగించుకోవచ్చు. అయితే మ్యూజిక్ కింద తప్పకుండా క్రెడిట్ ఇవ్వాల్సి ఉంటుంది.

Contentby: mannamweb.com


Saturday, June 15, 2024

వాట్సాప్‌లో డిలీట్ చేసిన మెసేజ్‌లను ఇలా చూడవచ్చు..ఈ ఈజీ ట్రిక్ చాలామందికి తెలియదు

వాట్సాప్‌లో డిలీట్ చేసిన మెసేజ్‌లను ఇలా చూడవచ్చు..ఈ ఈజీ ట్రిక్ చాలామందికి తెలియదు


ప్రపంచవ్యాప్తంగా కోట్లాది మంది వాట్సాప్(Whatsapp)ని ఉపయోగిస్తుంటారు. దీంతో మెసేజ్ లు, ఫొటోలు, వీడియోలు సులభంగా షేర్ చేసుకోవచ్చు. యాప్‌లో కాలింగ్, వీడియో కాలింగ్ సౌకర్యం కూడా అందుబాటులో ఉంది.


గోప్యతని దృష్టిలో ఉంచుకుని యాప్‌లో అనేక గోప్యతా ఆధారిత ఫీచర్‌లు కూడా అందించబడ్డాయి. అలాంటి ఒక ఫీచర్ డిలీట్ ఫర్ ఎవ్రీవన్. దీని కారణంగా, రిసీవర్, పంపిన వారి చాట్‌ల నుండి మేసేజ్ లు డిలీట్ అయిపోతాయి.

కానీ, ఇది తొలగించబడిన మేసేజ్ ల జాడను వదిలివేస్తుంది. కొన్ని మేసేజ్ లు పంపబడినట్లు, తొలగించబడినట్లు చూపుతుంది. చాలా మంది డిలీట్ అయిన మెసేజ్ లలో ఏముందో తెలుసుకోవడానికి ప్రయత్నిస్తారు. దీని కోసం కొన్ని థర్డ్ పార్టీ యాప్‌లు ఉన్నాయి, కానీ వాటిని ఉపయోగించడం ప్రమాదకరం. అందువల్ల Android ఫోన్‌లలో అందుబాటులో ఉన్న ఇన్-బిల్ట్ ఫీచర్ గురించి ఇప్పుడు చూద్దాం, దీని ద్వారా తొలగించబడిన మెసేజ్ లను చదవవచ్చు.


తొలగించబడిన టెక్స్ట్ మెసేజ్ లు మాత్రమే దీని ద్వారా చెక్ చేయవచ్చు. ఈ ఫీచర్ ఫోటోలు లేదా ఆడియో సందేశాలకు ఉపయోగపడదు. అలాగే, ఈ ఫీచర్ ఆండ్రాయిడ్ 11, అంతకంటే ఎక్కువ ఆండ్రాయిడ్ వెర్షన్‌లలో మాత్రమే అందుబాటులో ఉంటుంది.

డిలీట్ అయిన మెసేజ్ లను ఇలా చదవండి:

ముందుగా ఫోన్ సెట్టింగ్స్‌లోకి వెళ్లండి.

తర్వాత నోటిఫికేషన్‌లపై నొక్కండి.

దీని తర్వాత మరిన్ని సెట్టింగ్‌లకు(More settings) వెళ్లండి.

ఆపై నోటిఫికేషన్‌ల చరిత్రకు(Notifications history) వెళ్లండి.

ఆపై స్క్రీన్‌పై కనిపించే టోగుల్‌ను ఆన్ చేయండి.

ఈ ఫీచర్‌ని ఆన్ చేసిన తర్వాత, మీరు మళ్లీ Notifications ద్వారా నోటిఫికేషన్‌ల హిస్టరీకి వెళ్తారు. దీని ద్వారా మీరు 24 గంటల్లో డిలీట్ అయిన టెక్స్ట్ మెసేజ్ లను చూస్తారు.

Content By @mannamweb.com

Tuesday, May 28, 2024

How to Fix the “Windows Cannot Find” Error on Windows 10


How to Fix the “Windows Cannot Find” Error on Windows 10


Method 1: Select the This PC Option in File Explorer

First, you can fix the Windows cannot find file error by selecting the This PC option in File Explorer. You can follow the steps below:

Step 1: Type File Explorer in the Search menu to open it. Then, click the View tab.

Step 2: Click the Options button, and select Change folder and search options.

Step 3: Select This PC from the Open File Explorer to the drop-down menu and click OK.
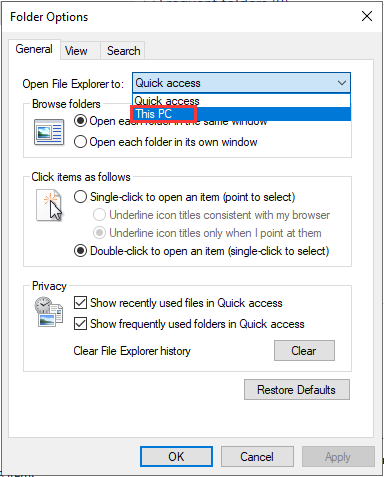
select This PC

Then, you can check to see if the Windows cannot find file Windows 10 error has been fixed. If not, you can try the following methods.


Method 2: Re-register Windows 10 Applications

You can also try to re-register Windows 10 applications to fix the “Windows cannot find” issue. The steps are as follows:

Step 1: Open Task Manager and click File > Run new task to open the window directly below.

Step 2: Type Powershell in the box and check the Create this task with administrative privileges box. Then click OK.

Step 3: Input Get-AppXPackage | Foreach {Add-AppxPackage -DisableDevelopmentMode -Register “$($_.InstallLocation)AppXManifest.xml”} and press the Enter key. Or you can copy and paste it directly to avoid errors.

After that, check to see if the “Windows cannot find” issue has gone.


Method 3: Run Windows Store App Troubleshooter

The Windows Store App troubleshooter might also help fix the “Windows cannot find” issue for apps. Now, follow the instructions below:

Step 1: Press the Windows key + I key at the same time to open the Settings application.

Step 2: Click the Troubleshoot tab and click the Windows Store Apps part. Then, click Run the troubleshooter.
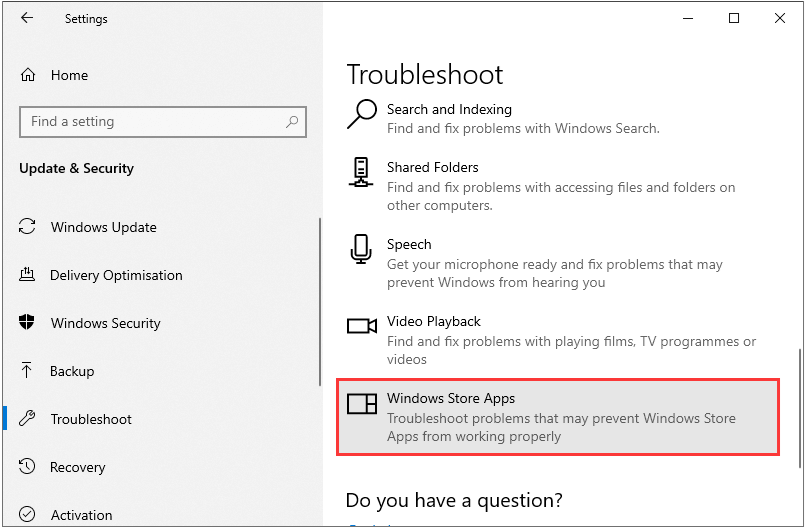
run Windows Store Apps troubleshooter

Then, it will start to troubleshoot and fix the issue. When it is finished, you can check to see if the “Windows cannot find” issue still exists. If it still exists, here is the last solution for you.

Method 4: Rename the Exe Files

Renaming the exe files is one resolution for “Windows cannot find” issue. Here is how to that.

Step 1: Browse to the folder location of the program that’s showing the “Windows cannot find” issue in File Explorer. If the software has a desktop shortcut, you can right-click the icon and select Open file location.

Step 2: Select the program’s exe file in File Explorer, and press the F2 key. Then type another title for the file, and press the Return key. Then, the issue should be fixed.

Final Words

How to fix the “Windows cannot find” error in Windows 10? Now after reading this post, you know 4 methods to get rid of it. Just choose one based on your actual situations to fix the annoying issue.

4 Easy Ways to Block Any Website on Your Computer

4 Easy Ways to Block Any Website on Your Computer


Method 1

Using Windows

 
  1. Click the Windows logo in the bottom-left corner of the screen.
  2. This will search your computer for the Notepad app.
  3. Right-click Notepad at the top of the Start window, click Run as administrator in the drop-down menu, and click Yes when prompted. The Notepad window will open.[1]
    • If your mouse doesn't have a right-click button, click the right side of the mouse, or use two fingers to click the mouse.
    • If your computer uses a trackpad instead of a mouse, use two fingers to tap the trackpad or press the bottom-right side of the trackpad.
  4. It's in the top-left corner of the window. A drop-down menu will appear.
  5. This option is near the top of the File drop-down menu. Doing so opens a File Explorer window.
  6. To do so:
    • Click This PC on the left side of the File Explorer window.
    • Scroll down and double-click your hard drive's name (usually OS (C:)) in the middle of the window.
    • Double-click the "Windows" folder.
    • Scroll down and double-click the "System32" folder.
    • Scroll down and double-click the "drivers" folder.
    • Double-click the "etc" folder.
  7. It's in the lower-right side of the window. A drop-down menu will appear.
  8. This option is in the drop-down menu. You should see several files appear in the main window.
  9. Find the "hosts" file in the main Notepad window, then do the following:
    • Right-click the "hosts" file.
    • Click Properties in the drop-down menu.
    • Click the Security tab.
    • Click Edit.
    • Check the "Full Control" box.
    • Click OK, then click Yes when prompted.
    • Click OK.
  10. Click the "hosts" file to do so.
  11. It's in the lower-right side of the window. The "hosts" file will open in Notepad.[2]
  12. Click the very end of the last line on the page, then press Enter.
  13. To block a website in your computer's browsers, do the following:
    • Type in 127.0.0.1 and press Tab .
    • Type in a website's address without the "www" section (e.g., "facebook.com", "twitter.com").
    • Press Enter to start a new line, then repeat the above two steps with other addresses you want to block.
  14. While you can block sites in most browsers using the above step, Google Chrome is slightly different: if you're blocking sites on Google Chrome, you'll need to place a space and then the "www.[site].com" version of the website's address after the "[site].com" version.[3]
    • To block Facebook, for example, you would type in 127.0.0.1 facebook.com www.facebook.com.
    • Adding the "http://" or "https://" part of the address as well (e.g., 127.0.0.1 facebook.com https://www.facebook.com can improve the chances of the site being blocked.
    • IP address — You can find a website's IP address and then block it in the "hosts" file to prevent people from accessing the website via its IP address.
    • Mobile site — By placing "m." in front of a website's address (e.g., "m.facebook.com" instead of "facebook.com"), you can block the mobile version of the website as well.
  15. To do so:
    • Click File in the top-left corner of Notepad.
    • Click Save As... in the drop-down menu.
    • Click the "Save as type" drop-down box, then click All Files in the drop-down menu.
    • Click the "hosts" file in the main window to select it.
    • Click Save, then click Yes when prompted.
  16. You'll use Command Prompt to perform this action. Flushing the DNS cache will prevent saved browser information from clashing with your blocked sites.[4]
    • Press the Windows key and type "cmd".
    • Right-click Command Prompt.
    • Click Run as administrator.
    • Click Yes to confirm.
    • In the Command Prompt, type ipconfig /flushdns.
    • Press Enter.
  17. If you have any browser windows open, close them and then re-open them. Any websites you added to the "hosts" file should now be blocked in your browsers.
    • If the websites still aren't blocked after restarting your browsers, try restarting your computer.
Method 2

On Mac

Download Article
  1. Click the magnifying glass icon in the upper-right side of your Mac's screen. A text box will appear.
  2. This will search your computer for the Terminal app.
  3. It should be the top option in the Spotlight search results. Doing so will open the Terminal app.
  4. Type in sudo nano /etc/hosts and then press Return.
  5. Type in the password that you use to log into your Mac, then press Return. The "hosts" file will open.
    • Terminal won't show your password's letters as you type.
  6. Press the key until the cursor is at the end of the last line of text on the page, then press Return.
  7. To block a website in your computer's browsers, do the following:
    • Type in 127.0.0.1 and press Tab .
    • Type in a website's address without the "www" section (e.g., "facebook.com").
    • Press Return to start a new line, then repeat the above two steps with other addresses you want to block.
  8. While you can block sites in most browsers using the above step, Google Chrome is slightly different: if you're blocking sites on Google Chrome, you'll need to place a space and then the "www.[site].com" version of the website's address after the "[site].com" version.
    • To block Facebook, for example, you would type in 127.0.0.1 facebook.com www.facebook.com.
    • Adding the "http://" or "https://" part of the address as well (e.g., 127.0.0.1 facebook.com https://www.facebook.com can improve the chances of the site being blocked.
    • IP address — You can find a website's IP address and then block it in the "hosts" file to prevent people from accessing the website via its IP address.
    • Mobile site — By placing "m." in front of a website's address (e.g., "m.facebook.com" instead of "facebook.com"), you can block the mobile version of the website as well.
  9. Once you have entered all of the sites that you want to block, save and exit by pressing Control+O and then pressing Return.
    • To exit the hosts file, press Control+X.
  10. Type in sudo killall -HUP mDNSResponder and press Return. This command will flush your Mac's DNS cache, which will ensure that all of the website's previous data (e.g., saved passwords) is erased. Your listed site should now be blocked in all browsers on your computer.
    • If your computer's browsers don't block the site, restart your computer to finalize the changes.
Method 3

Using Chromebook & Google Chrome

Download Article
  1. Open the Block Site page. This is the page from which you'll install Block Site.
    • Block Site allows you to block individual pages or entire websites. It also allows you to set a password so that other computer users can't change your block list.
  2. It's a blue button in the upper-right side of the page.
  3. This option will appear at the top of the page. Clicking it prompts Block Site to install.
  4. It's a shield-shaped option in the upper-right side of the Chrome page. A drop-down menu will appear.[5]
  5. You'll find this in the drop-down menu. Doing so opens the Block Site page.
    • You can also click the gear-shaped icon in the top-right corner of the drop-down menu if you want to open the Block Site page.[6]
  6. Click the "Enter a web address" text box near the top of the page, then type in the address of the website that you want to block.
    • If you want to block a specific page on a website, go to that page, then copy the address by clicking the address bar at the top of the window and then pressing Ctrl+C (Windows) or Command+C (Mac).
  7. It's to the right of the website text field. Your website will immediately be added to Block Site's list of blocked websites.
    • You can remove your site from Block Site's blacklist at any time by clicking the red circle icon to the right of the website's URL in the list of blocked sites.
  8. This tab is on the left side of the Block Site page.
  9. Doing so will create a password text box at the bottom of the page.
    • You can also check the "Enable password access to blocked pages" box if you want your password to allow you to open blocked sites.
  10. Type your preferred password (at least 5 characters) into the text box at the bottom of the page.
  11. It's to the right of the password text field. This will create your password and apply it to Block Site.
    • When accessing Block Site in the future, you'll need to enter your password before you can add or remove sites.
    • If you forget your password to Block Site, you can right-click the Block Site icon and click Remove from Chrome.
  12. One way that people can use to get around Block Site's restrictions is by using incognito mode, but you can enable Block Site in incognito to fix this problem:
    • Click
    • Select More tools
    • Click Extensions
    • Click DETAILS below the "Block Site" heading.
    • Click the grey "Allow in incognito" switch
      Android 7 Switch Off
      .
Method 4

Using Firefox

Download Article
  1. Its app icon resembles an orange fox wrapped around a blue globe.
  2. Open the Block Site webpage. This is the location from which you'll download Block Site.
  3. This blue button is in the middle side of the page. You may have to scroll down to see it.
  4. This is also at the top of the window. Doing so will install Block Site in your Firefox browser.
  5. It's an orange, shield-shaped icon in the upper-right side of the window. A drop-down menu will appear.[7]
    • You may have to click Got it in the drop-down menu before proceeding.
  6. This is in the drop-down menu. Doing so opens the Block Site page.
    • You can also click the gear-shaped icon in the top-right corner of the drop-down menu to open the Block Site page.[8]
  7. Click the "Enter a web address" text box near the top of the page, then type in the address of the website that you want to block.
    • If you want to block a specific page on a website, go to that page, then copy the address by clicking the address bar at the top of the window and then pressing Ctrl+C (Windows) or Command+C (Mac).
  8. It's to the right of the website text field. Your website will immediately be added to Block Site's list of blocked websites.
    • You can remove your site from Block Site's blacklist at any time by clicking the red circle icon to the right of the website's URL in the list of blocked sites.
  9. Go to the Block Site page. On the left side you will find the tab.
  10. The password text box should appear at the bottom of the page.
    • Check the "Enable password access to blocked pages" box if you want your password to allow you to open block sites.
  11. This will set your password and apply it to Block Site.
    • You'll need to enter your password before you can add or remove sites.
    • If you forget your password to Block Site, you can remove it from Firefox by clicking , clicking Add-ons, and clicking Remove to the right of "Block Site" on the Extensions page.


కొత్తగా యూట్యూబ్ ఛానెల్ పెట్టారా? ఫ్రీ ఇమేజ్ లు, మ్యూజిక్ ట్రాక్స్ అందించే వెబ్ సైట్లు ఇవే!

  కొత్తగా యూట్యూబ్ ఛానెల్ పెట్టారా? ఫ్రీ ఇమేజ్ లు, మ్యూజిక్ ట్రాక్స్ అందించే వెబ్ సైట్లు ఇవే! ప్రస్తుతం అంతా సోషల్ మీడియా(Social media) యుగం...