Translate

Tuesday, May 28, 2024

How to Clear and Turn Off Recent Files in Windows 10


How to Clear and Turn Off Recent Files in Windows 10

 here are several ways to clear your Recent Files history in Windows 10:

(a) Using the File Explorer Icon in the Task Bar

  1. Launch File Explorer on your computer. By default, the File Explorer icon is pinned to your taskbar. The icon itself is shaped like a suitcase with a pale blue handle.
  2. Once the File Explorer window opens, click on File in the top left corner and then select Change folder and search options.
  3. Under Privacy, click on Clear. This will immediately clear your Recent Files history, and you’ll now start populating the list afresh.

Unlike most commands in Windows 10, clearing Recent Files doesn’t come with a confirmation dialog box. Your recent files are cleared immediately without any further action.

(b) Clearing Recent Files Manually

Any files you open on your PC are automatically stored in the form of cached data. If you want to wipe clean your Recent Files menu, you can find this information and safely delete it. Here’s how:

  1. Open the Run window by typing “run” in the search bar in the bottom left corner of your screen. Alternatively, press the Windows key + R simultaneously.
  2. Type the following command in the Run prompt:
    %AppData%\Microsoft\Windows\Recent\

    This should launch a new window with a list of your entire Recent Files history.
  3. Click on Select all in the menu bar.
  4. Once you’ve selected all the items in the list, click on Delete and then select Permanently delete from the dropdown menu. At this point, all the files you’ve accessed recently will disappear from File Explorer.

How to Disable Recent Files in Windows 10

Recent Files is undoubtedly a nifty feature that allows you to quickly jump back to your most recently used documents or folders. However, this feature also comes with more clutter. There will be more and more items in your File Explorer as you continue using your computer. If you’d rather start with a clean slate every time you log on, you need to disable Recent Files permanently. There are several ways to do it. Let’s see how each works:

(a) Disabling Through the Group Policy Editor

If your computer runs on the “Pro” version of Windows 10, you can use the Group Editor Policy to modify various settings on your system.

The Group Policy Editor is a tool that can be used to manage policies and settings within Windows configuration. It’s most commonly used to manage password policies, controls for system security, or account-related options on computers in an organizational domain. It may also be possible to use this tool with your home computer. However, you should consult the documentation for your device before attempting any changes.

Here’s how you can clear your Recent Files history using the Group Editor Policy:

  1. Open the Run window by typing “run” in the search bar in the bottom left corner of your screen. Alternatively, press the Windows key and “R” simultaneously.
  2. Type the following command in the Run prompt:
    gpedit.msc
  3. Click on OK to run the command. This should launch the “Local Group Policy Editor” window.
  4. Under User Configuration, click on Administrative templates.
  5. Double click on Start Menu and Taskbar.
  6. Double click on Remove recent items menu from Start Menu.
  7. From the resulting window, select the Enabled option and then click on OK.

(b) Disabling Through the Control Panel

The control panel can help you to tweak your system so that it will never keep track of your files history no matter how often you use a program or application. To disable Recent Files using this approach:

  1. Type “control panel” in the windows search bar.
  2. Once the control panel opens, click on Appearance and Personalization.
  3. Click on Taskbar and Navigation.
  4. Click on Start.
  5. Turn off the button next to Show recently opened items in Jump Lists on the Start or the Taskbar.

(c) Disabling Through the Registry Editor

To disable Recent Files through the Registry Editor:

  1. Open the Run window by typing “run” in the search bar in the bottom left corner of your screen. Alternatively, press the Windows key + R simultaneously.
  2. Type the following command in the Run prompt:
    regedit
  3. Click on OK to run the command. This should launch the “Registry Editor” window.
  4. Open the following key:
    HKEY_CURRENT_USER\Software\Microsoft\Windows\CurrentVersion\Policies\Explorer
  5. Right-click on the right pane, click on New >DWORD (32-bit) Value from the dropdown. This will instantly create a new value named “New Value #1.”
  6. Rename the name as “NoRecentDocsHistory.”
  7. Right-click on the new value and then click Modify.
  8. Enter 1 under Value data and then click OK.
  9. Restart your computer.

After restarting your computer, Windows will no longer display your Recent Files menu in File Explorer.

Additional FAQs

1. Why should I clear recent files from time to time?

Clearing Recent Files frequently comes with several benefits. First, you’re able to declutter your system and ensure that important documents do not accidentally get deleted or overwritten. Second, no one will be able to track your Windows usage history if you share your computer with others. In addition, a packed File Explorer can slow down your computer and make it take much longer to start up. It can also lead to other problems, such as out-of-memory errors or error messages that pop up when you work with certain programs, slowing your overall PC performance.

2. How can I delete individual files from recent files?

If you want to clear some items and keep others:

1. Open the Run window by typing “run” in the search bar in the bottom left corner of your screen. Alternatively, press the Windows key + R simultaneously.

2. Type the following command in the Run prompt:

%AppData%\Microsoft\Windows\Recent\

This should launch a new window with a list of your entire Recent Files history.

3. Click on the specific item you’d like to delete.

4. Click on Delete and then select Permanently delete from the dropdown menu. At this point, the item you’ve selected will no longer be in the Recent Files window.

3. How can I hide recent files in File Explorer?

If you want to get rid of the Recent Files list without tweaking your system too much, you may be better served by hiding the list altogether. Here’s how:

1. Launch File Explorer on your computer.

2. Click File in the top left corner and then select Change folder and search options.

3. Under Privacy, uncheck the boxes next to Show recently used files in Quick access and Show frequently used folders in Quick access.

4. Click OK to save your new settings.

Keep Your History Private

Windows 10 is designed with privacy in mind. If you don’t want others viewing what you have been writing or using recently, you should either clear or turn off Recent Files on your computer. In this article, we’ve shown you how to go about it.

Why do you like clearing your Recent Files history from time to time? How exactly do you do it?

Wednesday, May 8, 2024

How to Block a Program in a Firewall in 6 Steps (Easy Tutorial)

How to Block a Program in a Firewall in 6 Steps (Easy Tutorial)


1. Open the Settings for Windows Defender Firewall with Advanced Security 

Use one of the following methods to open the Windows Defender Firewall with Advanced Security. 

Method 1

  • Press the Windows key and the R key at the same type to open the Run dialog box. 
  • Type “WF.msc” into the box.
  • Hit the “OK” button or Enter.

Method 2

  • Press the Windows key to open the search function.
  • Start typing “Windows Defender Firewall” and select the application when it appears.
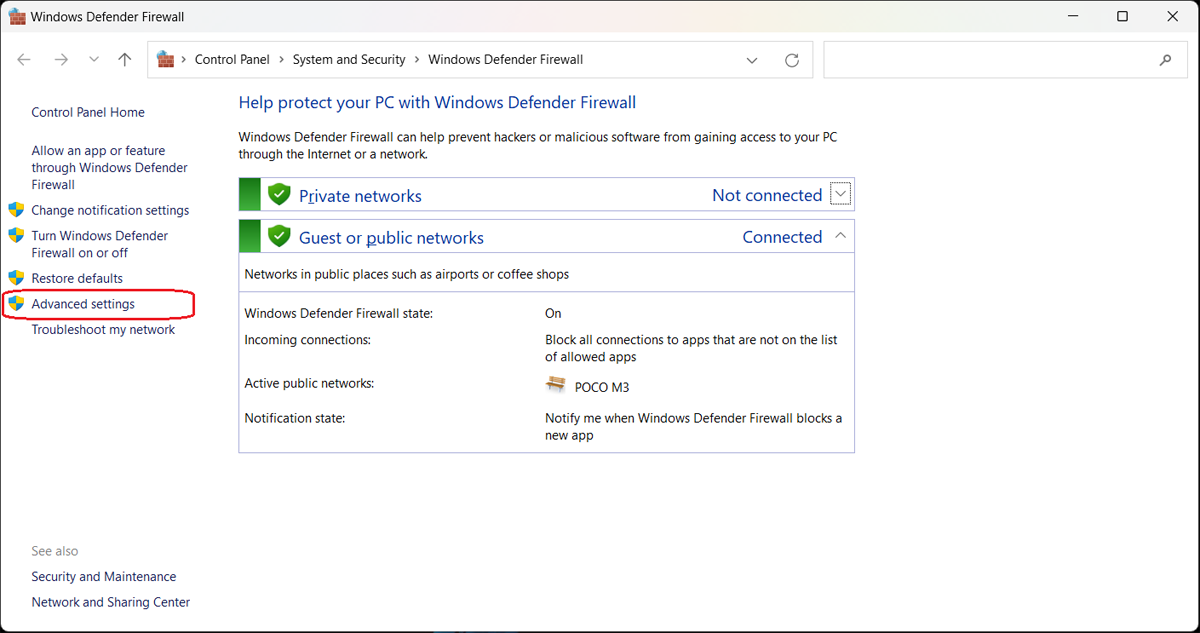
  • From the Windows Defender Firewall screen, select Advanced Settings in the left sidebar.

Step 1: Open Windows Defender Firewall with Advanced settings.

2. Select Inbound Rules or Outbound Rules

Choose whether you want to set an inbound rule allowing access to your computer for an external application or program, or an outbound rule allowing an application or program installed on your computer external access through the firewall. 

The program-blocking process is similar for both types of rules—for this example, we’ll choose Outbound Rules to block a program in the firewall. 

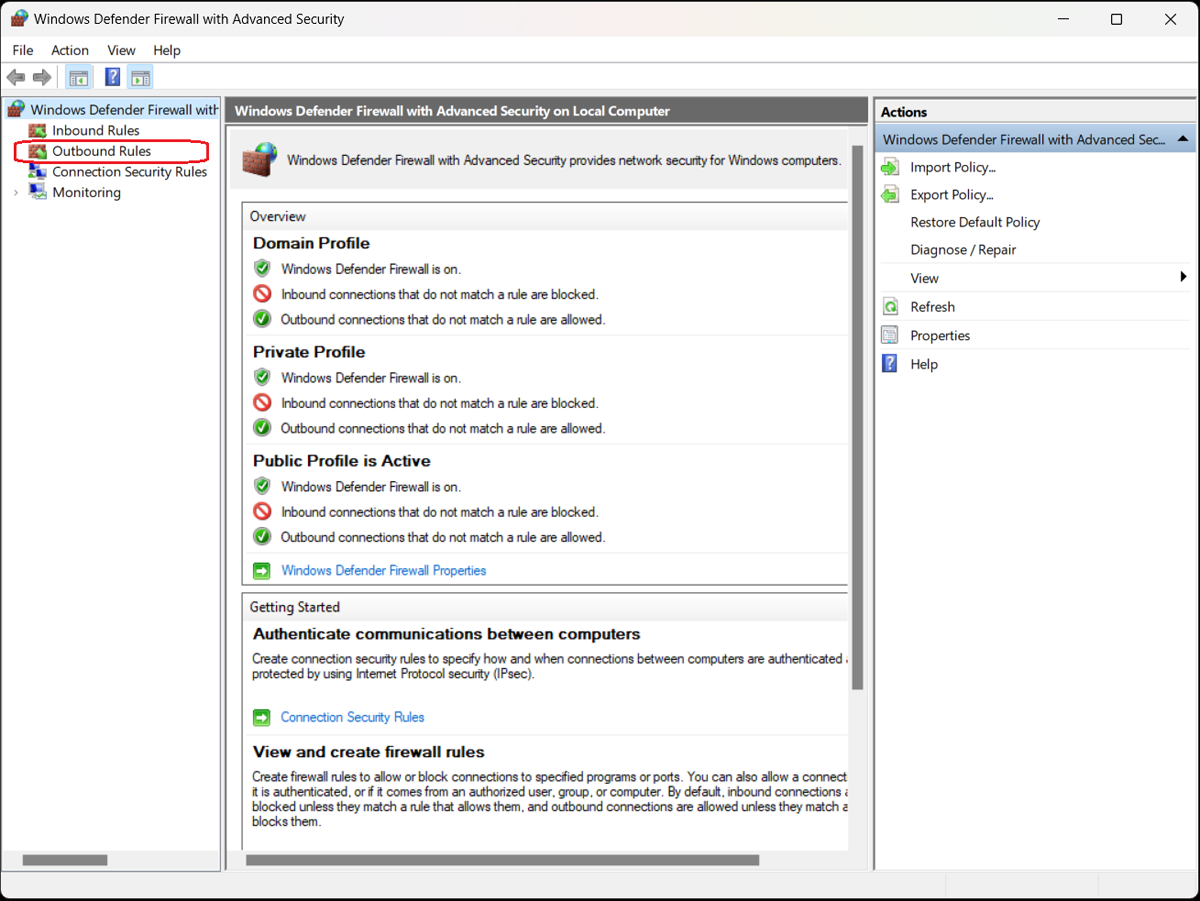
Select the appropriate option from the left sidebar of the Windows Defender Firewall with Advanced Security screen. A list of outbound rules appears detailing their names, groups, profiles, and status (enabled/disabled).

Step 2: Select Inbound or Outbound rules.

3. Create a New Rule

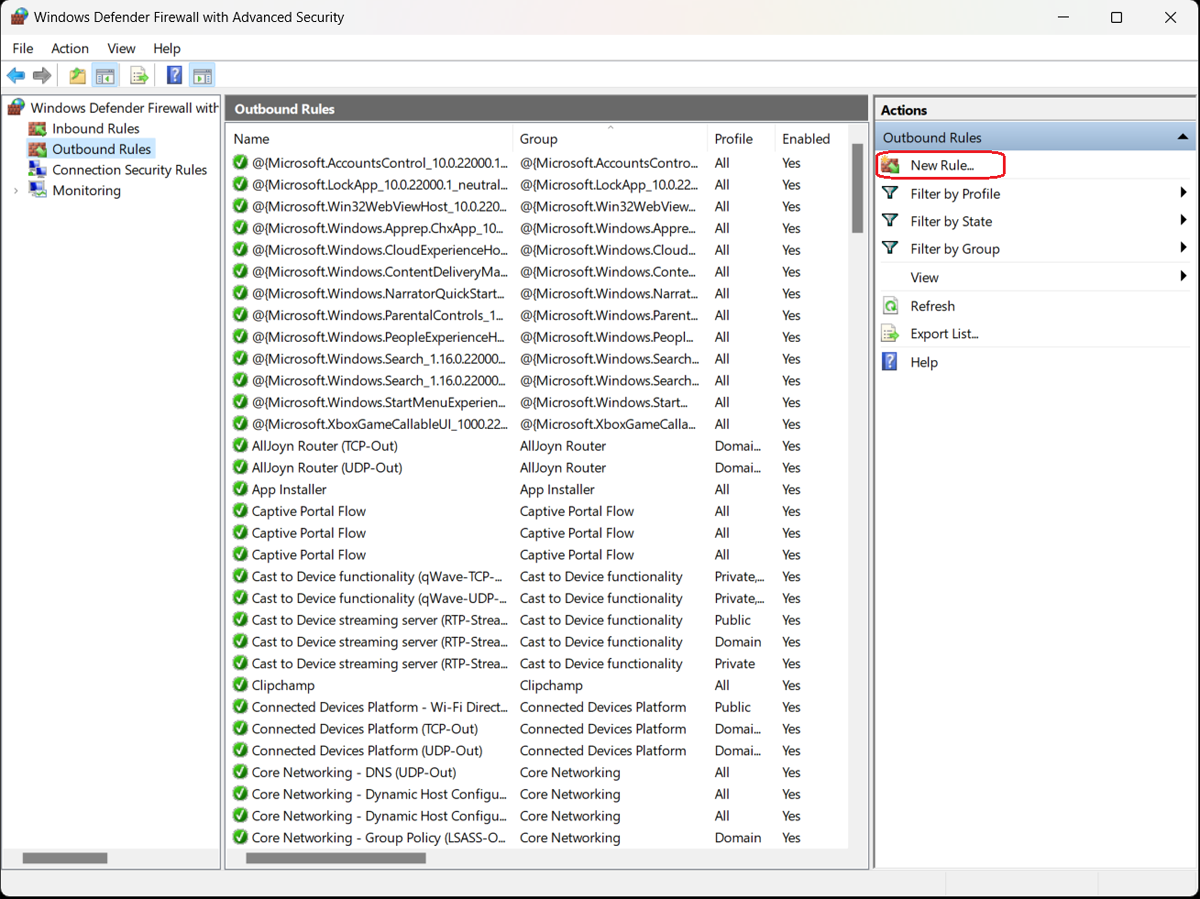
In the sidebar to the right of the list of existing outbound rules, click the “New Rule…” option. The New Outbound Rule Wizard opens, presenting four options for type of outbound rule: 

  • Program
  • Port
  • Predefined
  • Custom
Step 3: Click the New Rule option.

4. Select “Program” 

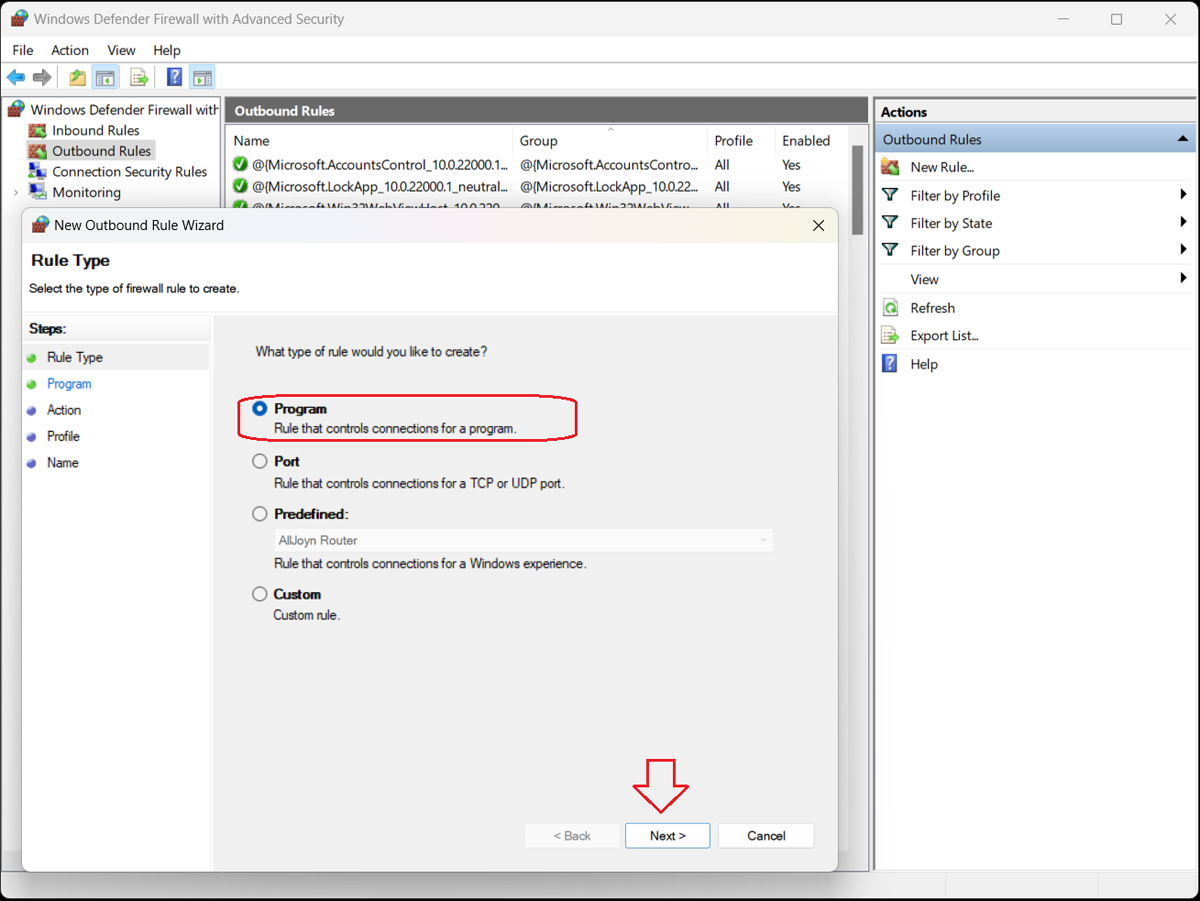
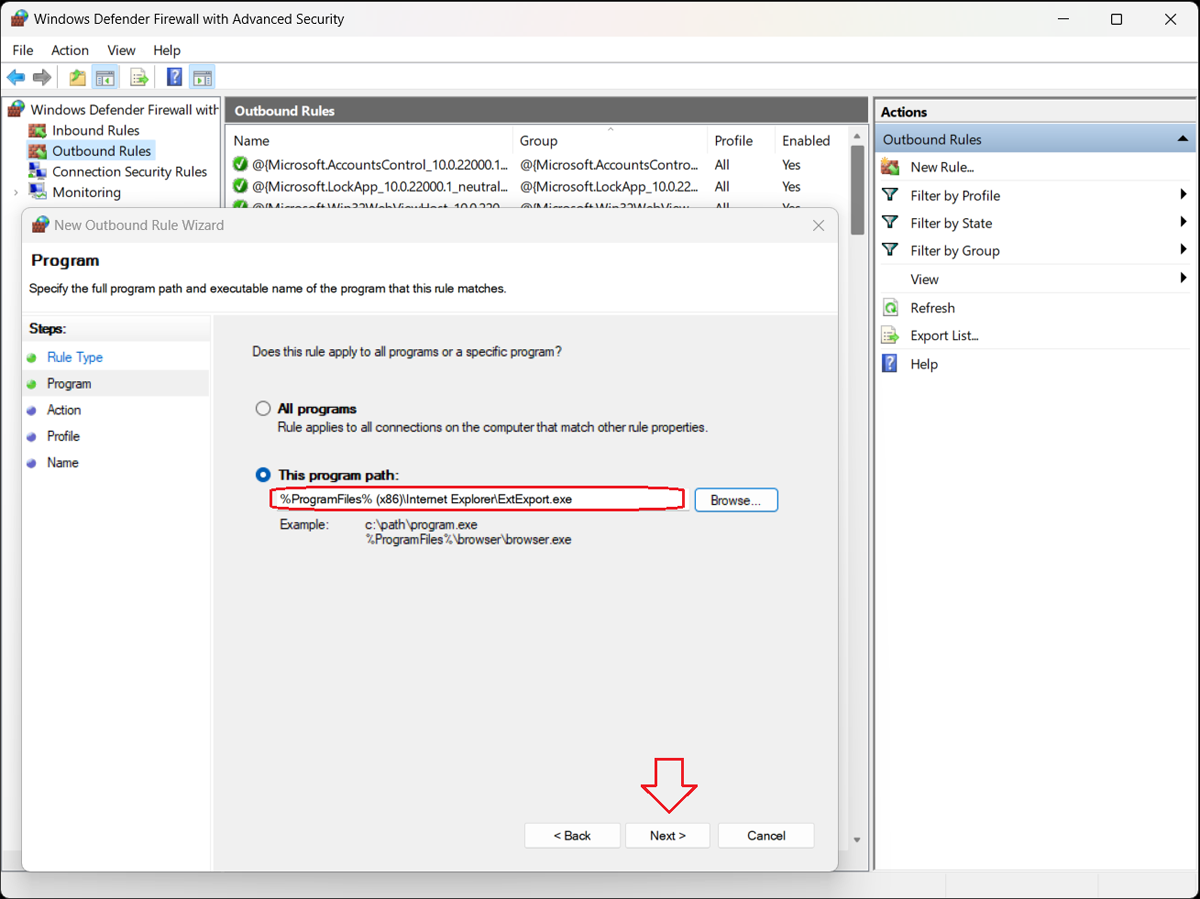
Select Program  and click the “Next>” button. The Program dialog box opens to ask whether you want this rule to apply to all programs or just one specific program.

Step 4a: Select the Program option.


To block a specific program, select the “This program path” option and click the “Browse…” button to open the program folder.

Locate and select the executable file (.exe) for the program you want to block.

Click the “Next>” button.

Step 4b: Select the Program option.

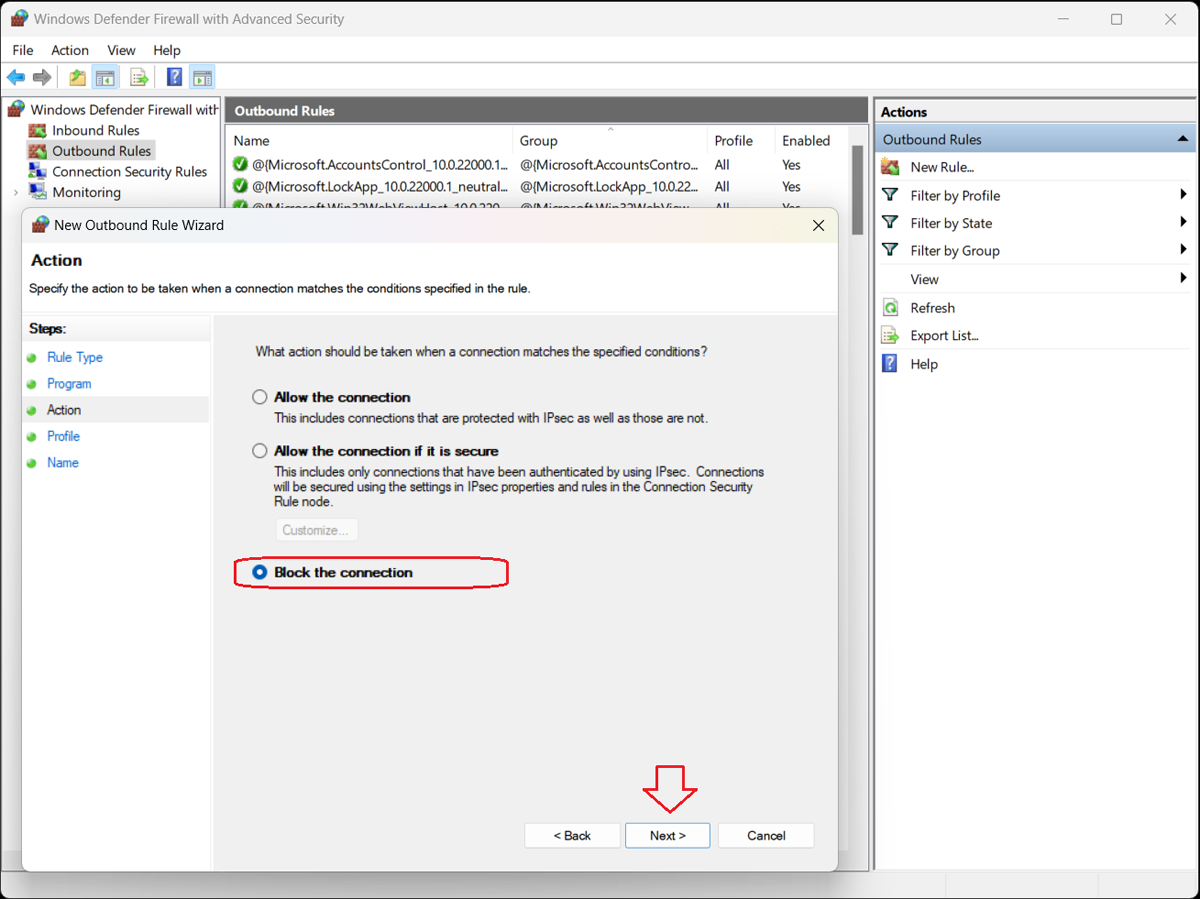
5. Block the Connection 

The Action window of the New Outbound Rule Wizard opens, presenting three options: 

  • Allow the connection. This includes connections that are protected with IPsec and well as those that are not.
  • Allow the connection if it is secure. This includes only connections that have been authenticated by using IPsec. Connections will be secured using the settings in IPsec properties and rules in the Connection Security Rule node. 
  • Block the connection. This blocks the connection.

Select “Block the connection” and click the “Next>” button.

Step 5: Select the Block the Connection option.

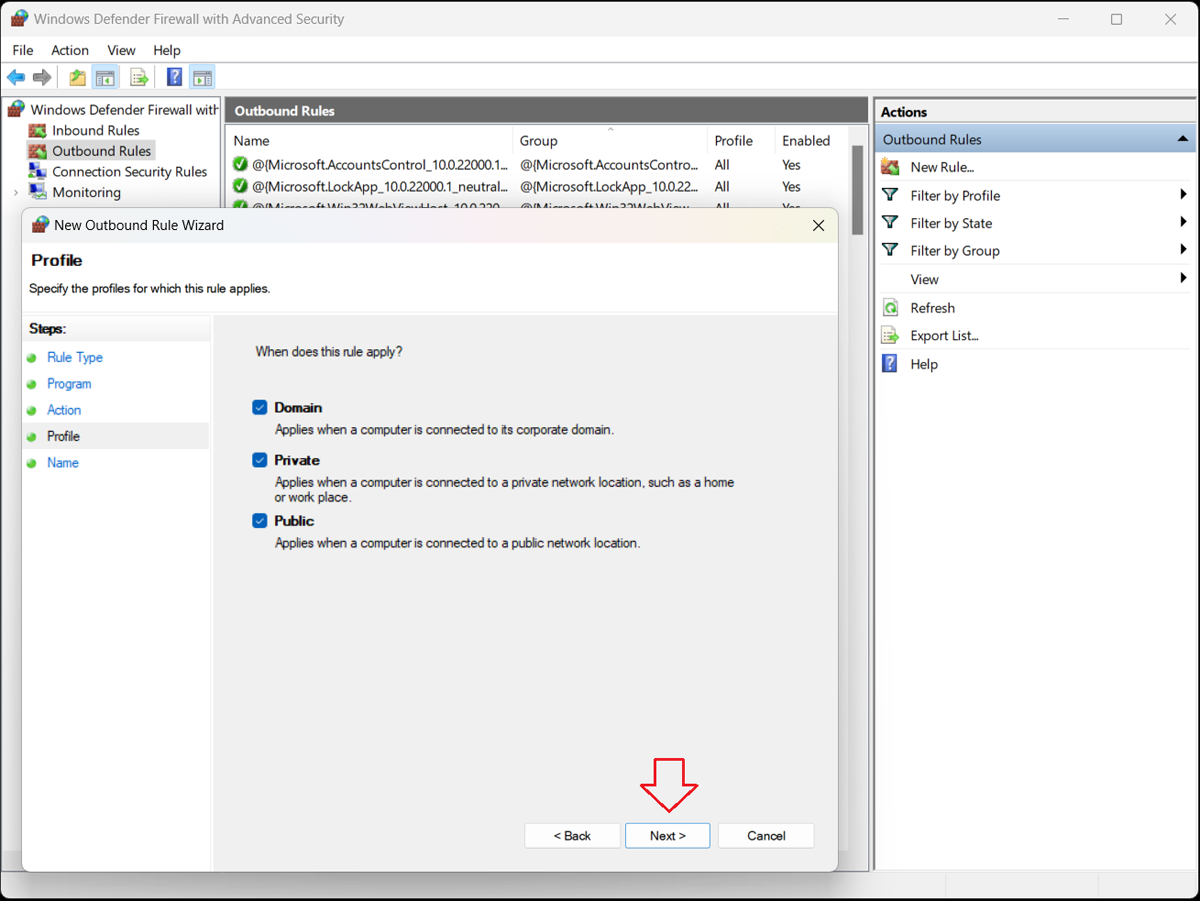
6. Specify the Profiles

The Profile window of the New Outbound Rule Wizard opens, presenting three options: 

  • Domain–Applies when a computer is connected to its corporate domain.
  • Private–Applies when a computer is connected to a private network location, such as a home or workplace.
  • Public–Applies when a computer is connected to a public network location.

Specify when the rule will apply and click the “Next>” button.

Step 6a: Specify the Profiles and Name.

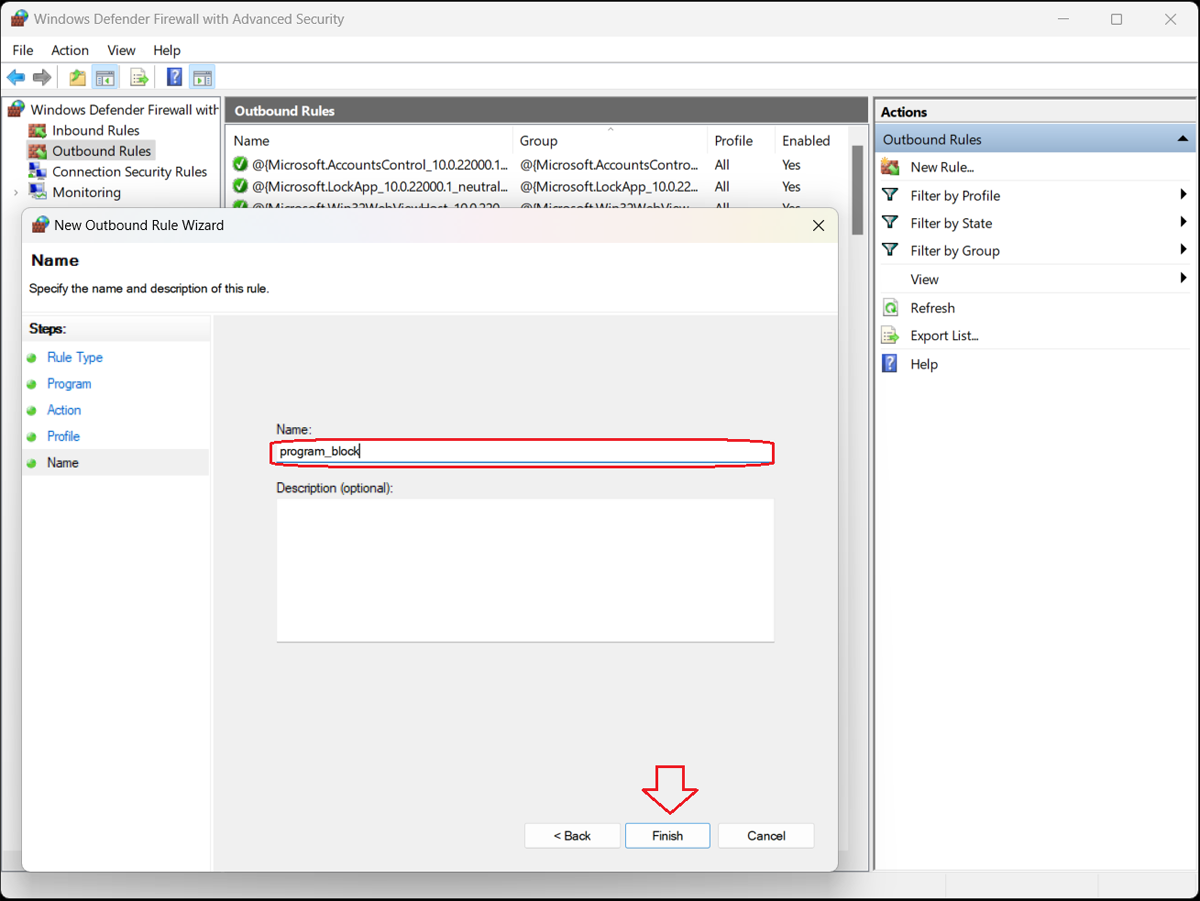
7. Assign the Rule a Name and Description

The Name window of the New Outbound Rule Wizard opens. In the empty fields, assign a name and description for the rule. Click the “Finish” button.

Step 6b: Specify the Profiles and Name.


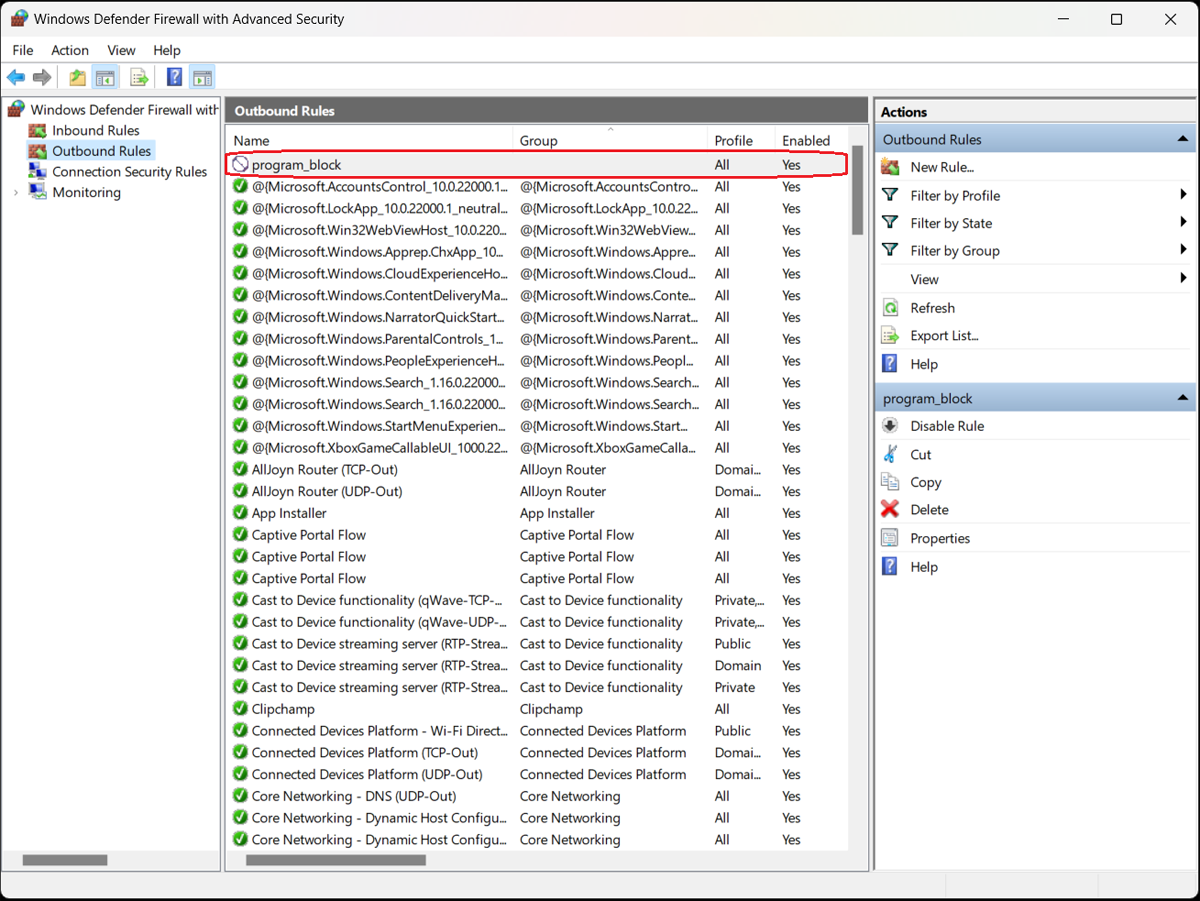
The Windows Defender Firewall with Advanced Security box lists all the existing outbound rules. Confirm that your new rule is included in the list. The program is now blocked; to unblock it, simply select and delete the rule.

You can unblock other programs the same way—to find them, sort the list by name, profile, state (enabled/disabled), or group and click Disable Rule in the right sidebar. You can also perform cut, copy, and delete rules or view their properties.

Step 6c: Specify the Profiles and Name.


Are These Steps the Same for Other Firewalls?

Firewalls are essential for controlling traffic in networks and ensuring protection against hackers, malware, and ransomware attacks. Most computer operating systems (OS) include built-in firewalls, and many cybersecurity vendors offer third-party firewalls with context-aware network security features that integrate with other services. 

The process involved in blocking a program in a firewall can vary based on the firewall and operating system, but the steps are similar to those modeled here. 

Bottom Line: Optimize Your Firewall

While the steps covered here apply to blocking a program in a firewall for an individual computer, enterprise-scale firewalls can be deployed to protect entire networks of computers. These enterprise-class products perform the same functions as an individual firewall by using rules to determine whether to allow access to programs and apps.

Firewalls are a critical part of network security, blocking inbound access for harmful programs and applications and preventing outbound access for installed applications and services. When configured properly and used appropriately, a firewall can safeguard your data against today’s threats.

Tuesday, April 30, 2019

*Best* Android WiFi hacking for 2018 – Techincidents

*Best* Android WiFi hacking for 2018 – Techincidents


Android WiFi hacking Apps are quite familiar and those apps grab everyone attention.
Contrasted with wired systems, WiFi systems represent an additional security challenge as their signs are open to the public and WiFi Hacking possible.
Android phones are most well known in light of the accessibility of a great many applications in the market. Android phones are most famous due to the accessibility of a large number of applications in the store.
There a lot of WiFi Hacking Apps available here we listed the most famous App.

5 Best Android WiFi hacking Apps

Aircrack-ng

Aircrack-ng is an 802.11 WEP and WPA-PSK keys cracking project that can recuperate keys once enough information bundles have been caught. It actualizes the standard FMS assault alongside a few advancements like KoreK assaults, and in addition, the PTW assault, subsequently making the assault significantly speedier contrasted with other WEP splitting devices.
It concentrates on various ranges of WiFi security:
Checking: Packet catch and fare of information to content records for additionally preparing by outsider devices.
Assaulting: Replay assaults, deauthentication, fake access focuses and others through packet injection.
Testing: Checking WiFi cards and driver capacities (catch and infusion).
Cracking: WEP and WPA PSK (WPA 1 and 2).

Androdumper

The Application will endeavor to associate with WPS empowered Wifi Routers that have the WPS helplessness. utilizing a few calculations to associate with the Wifi.
It not just let you confirm the security of your purpose of access, however, it likewise gives you a chance to see every one of the passwords for all the WiFi arranges that you have associated with from that Android gadget.

Wps Wpa Tester

Wps Wpa Tester is an application that encourages you to check if the WPS convention of your purpose of access has any vulnerabilities. With this application, you can play out this beware of any system, however, it’s prescribed to utilize it only all alone.
**Devices WITHOUT root authorizations and with Android >= 5.0 (Lollipop), can associate with this application yet they CANNOT see the WEP-WPA-WPA2**
**Devices WITHOUT root consents and with Android < 5.0 (Lollipop), CANNOT be associated with this application and they CANNOT see the WEP-WPA-WPA2**

Kali Linux NetHunter

The Kali Linux NetHunter venture is the main Open Source Android infiltration testing stage for Nexus devices.NetHunter underpins Wireless 802.11 casing infusion, a single tick MANA Evil Access Point setups, HID console (Teensy like assaults), and BadUSB MITM assaults.
The Kali NetHunter design interface enables you to effortlessly arrange complex setup documents through a neighborhood web interface.
This component, together with a custom portion that backings 802.11 remote infusion and preconfigured associate back VPN administrations, make the NetHunter an imposing system security device.

Zanti

Zanti is one of the best Android WiFi hacking Apps created by Zimperium and have huge numbers of download. Essentially, this application is utilized for wi-fi arrange entrance or security evaluation.
Its WiFi scanner demonstrates the entrance focuses with known default enter design in green. You can likewise utilize the application to murder associations with keeping the objective to get to any site or server.

Top 150 Windows Command Prompts Hacking Command Tricks[Update]

Top 150 Windows Command Prompts Hacking Command Tricks[Update]


In This Article, we are Going to see about Top 150 Command Prompts HackingCommand Tricks
Command Prompt, also known as cmd.exe or cmd (after its executable file name), is the command-line interpreter on Windows NT, WindowsCE, OS/2 and eComStation operating systems.
We can Do a lot More Tricks use Command Prompt.
To Open Command Prompt Window use Following Steps
#1: Press Windows + R
#2: Type “cmd” In Run Box and Press Enter.
Here We can see the most Important Command Prompt Hacking Tricks.
Before Pase the Following Command, make sure you are in c:\>
1. Accessibility Controls – access.cpl | Best CMD Tricks
2. Accessibility Wizard – accwiz
3. Add Hardware Wizard – hdwwiz.cpl
4. Add/Remove Programs – appwiz.cpl
5. Administrative Tools – control admintools
6. Automatic Updates – wuaucpl.cpl
7. Bluetooth Transfer Wizard – fsquirt
8. Calculator – calc
9. Certificate Manager – certmgr.msc
10. Character Map – charmap
11. Check Disk Utility – chkdsk
12. Clipboard Viewer – clipbrd
13. Command Prompt – cmd
14. Component Services – dcomcnfg
15. Computer Management – compmgmt.msc
16. Control Panel – control
17. Date and Time Properties – timedate.cpl
18. DDE Shares – ddeshare
19. Device Manager – devmgmt.msc
20. Direct X Troubleshooter – dxdiag
21. Disk Cleanup Utility – cleanmgr
22. Disk Defragment – dfrg.msc
23. Disk Management – diskmgmt.msc
24. Disk Partition Manager – diskpart
25. Display Properties – control desktop
26. Display Properties – desk.cpl
27. Dr. Watson System Troubleshooting Utility – drwtsn32
28. Driver Verifier Utility – verifier
29. Event Viewer – eventvwr.msc
30. Files and Settings Transfer Tool – migwiz
31. File Signature Verification Tool – sigverif
32. Findfast – findfast.cpl
33. Firefox – firefox
34. Folders Properties – control folders
35. Fonts – control fonts
36. Fonts Folder – fonts
37. Free Cell Card Game – freecell
38. Game Controllers – joy.cpl | Best CMD Commands 2017
39. Group Policy Editor (for xp professional) – gpedit.msc
40. Hearts Card Game – mshearts
41. Help and Support – helpctr
42. HyperTerminal – hypertrm
43. Iexpress Wizard – iexpress
44. Indexing Service – ciadv.msc
45. Internet Connection Wizard – icwconn1
46. Internet Explorer – iexplore
47. Internet Properties – inetcpl.cpl
48. Keyboard Properties – control keyboard
49. Local Security Settings – secpol.msc
50. Local Users and Groups – lusrmgr.msc
51. Logs You Out Of Windows – logoff
52. Malicious Software Removal Tool – mrt
53. Microsoft Chat – winchat
54. Microsoft Movie Maker – moviemk
55. Microsoft Paint – mspaint
56. Microsoft Syncronization Tool – mobsync
57. Minesweeper Game – winmine
58. Mouse Properties – control mouse
59. Mouse Properties – main.cpl
60. Netmeeting – conf
61. Network Connections – control netconnections
62. Network Connections – ncpa.cpl
63. Network Setup Wizard – netsetup.cpl
64. Notepad – notepad
65. Object Packager – packager
66. ODBC Data Source Administrator – odbccp32.cpl
67. On Screen Keyboard – osk
68. Outlook Express – msimn
69. Paint – pbrush
70. Password Properties – password.cpl
71. Performance Monitor – perfmon.msc
72. Performance Monitor – perfmon
73. Phone and Modem Options – telephon.cpl
74. Phone Dialer – dialer
75. Pinball Game – pinball
76. Power Configuration – powercfg.cpl
77. Printers and Faxes – control printers
78. Printers Folder – printers
79. Regional Settings – intl.cpl
80. Registry Editor – regedit
81. Registry Editor – regedit32
82. Remote Access Phonebook – rasphone
83. Remote Desktop – mstsc
84. Removable Storage – ntmsmgr.msc
85. Removable Storage Operator Requests – ntmsoprq.msc
86. Resultant Set of Policy (for xp professional) – rsop.msc
87. Scanners and Cameras – sticpl.cpl
88. Scheduled Tasks – control schedtasks
89. Security Center – wscui.cpl
90. Services – services.msc
91. Shared Folders – fsmgmt.msc
92. Shuts Down Windows – shutdown
93. Sounds and Audio – mmsys.cpl
94. Spider Solitare Card Game – spider
95. SQL Client Configuration – cliconfg
96. System Configuration Editor – sysedit
97. System Configuration Utility – msconfig
98. System Information – msinfo32
99. System Properties – sysdm.cpl
100. Task Manager – taskmgr
101. TCP Tester – tcptest
102. Telnet Client – telnet
103. User Account Management – nusrmgr.cpl
104. Utility Manager – utilman
105. Windows Address Book – wab
106. Windows Address Book Import Utility – wabmig
107. Windows Explorer – explorer.
108. Managing the Boot Configuration Data – bcdedit
109. Editing Boot Settings – bootcfg
110. Encrypting or Decrypting Files/folders – cipher
111. Clearing the screen – cls
112. Managing stored usernames/passwords – cmdkey
113. Changing CMD Color – color
114. Compressing one or more files – compress
115. Converting FAT drives to NTFS – convert
116. Delete files – del
117. Deleting User Profiles – delprof
118. Displaying the list of files and folders – dir
119. Displaying Message On Screen – echo
120. Deleting one or more files – erase
121. Opening the windows Explorer – explorer
122. Formatting a disk – format
123. Knowing file extension – ftype
124. Displaying the Mac Address – getmac
125. Online help – help
126. Displaying the host name – hostname
127. Editing disc label – label
128. Log a user off – logoff
129. Get a log time in a file – logtime
130. Creating .cab files – makecab
131. Creating new folders- md
132. Opening Windows Installer – msiexec
133. Managing the network resources – net
134. Knowing the permissions for a user – perms
135. Testing a network connecting – ping
136. Printing a text file – print
137. Shutdown computer – psshutdown
138. Checking free disk space – freedisk
139. Know the file and volume utilities – fsutil
140. File transfer protocl – ftp
141. Showing the space used in folders – diskuse
142. Deleting a folder and all subfolders – deltree
143. Importing or Exporting Active directory data – csvde
144. Displaying the resultant set of Policy information – gpresult
145. Updating the Group policy settings – gpupdate
146. Replacing the files that are currently in use by the os – inuse
147. Comparing two files – fc
148. Finding a text string in a file – find
149. Finding for a strings in file – findstr
150. Displaying the memory usage – mem
Taking this information by https://techincidents.com/

Wednesday, April 3, 2019

4 Best Ways to Reset Windows 7 Password with Ease

Did you forget your admin password to login on your Windows 7 computer? Can't find the password? It's really a headache thing when you forgot Windows 7 password, especially there are important data stored on it, which stops you reinstalling the system.
Fortunately, there are 4 different ways you can reset your lost Windows 7 password, so one is bound to work for you. Each of the techniques covered are quick and easy, and won't keep your waiting. Check them out below.

Method 1: Use Windows 7 Password Reset Disk

A password reset disk could really come in handy if you ever forgot Windows 7 password. The problem with this method is that you have to create the password reset disk before you forgot the password. Assuming that you have created it beforehand, then you can follow the steps below to reset a lost password easily.
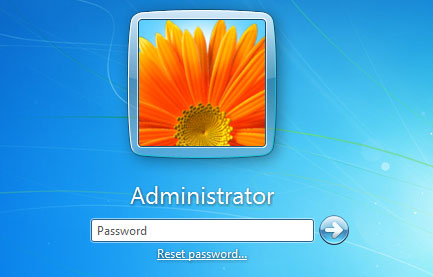
  1. Once you've typed the wrong password, Windows 7 will show a Reset password link below the login box.
    Forgot Windows 7 Password
  2. Make sure that password reset disk is plugged into the computer at this point. Click on the Reset password link.
  3. When the Password Reset Wizard appears, click Next to continue.
  4. Select the password reset disk from the drop-down list. Click Next.
  5. Type a new password and verify it, as well as entering a password hint. Click Next.
  6. Click Finish. Now you can log in to Windows 7 with the new password.

Method 2: Reset Windows 7 Password from Command Prompt

Resetting Windows 7 password isn't difficult, as long as you have a second administrator account to use. Of course, this assumes that you haven't also forgotten the password for the other administrator account. If you don't remember that password, either, skip to one of the other methods outlined below.
If you can login with an account that has administrator privileges, you can reset the password of any user account from the Command Prompt:
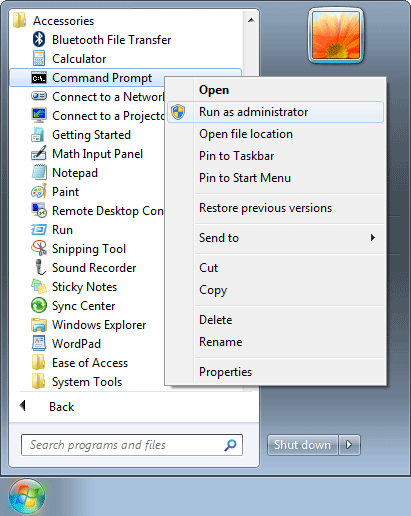
  1. Click on the Start button, then select All Programs, and then Accessories. Right-click on the Command Prompt shortcut and select Run as administrator as shown below.
    Open Command Prompt with Administrator Privilges
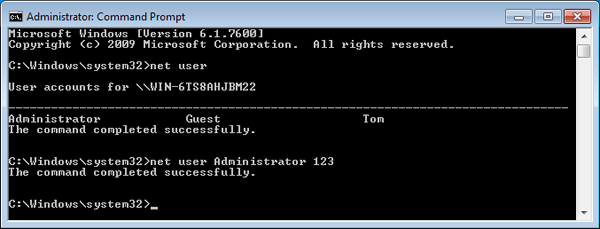
  2. This will open a Command Prompt in administrator mode. Type net user and press Enter. It displays a list of the user accounts on the computer.
  3. Type the following command and press Enter to reset Windows 7 password. Replace username with your desired account, and replace new_password with the password of your choice.
    net user username new_password
    Reset Windows Password from Command Prompt

Method 3: Reset Windows 7 Password with Install Disk

Advanced computer users often prefer to reset forgotten Windows 7 password with this exploit. Assuming you have your Windows 7 install disk, you can take use of the Sticky Keys feature on the login screen by 'tricking' Windows into launching a fully privileged Command Prompt. Once you have access to Command Prompt, resetting a user password is a matter of few commands.
  1. Restart your computer and boot up from Windows 7 install disk.
  2. When the keyboard / language setup screen appears, click the Repair your computer link at the bottom.
  3. Select Command Prompt from the list of recovery options.
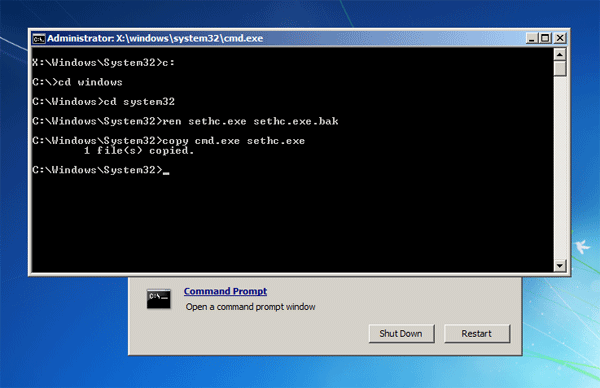
  4. Now you should be at the Command Prompt, enter the following commands, pressing Enter after each line.
    c:
    cd windows
    cd system32
    ren sethc.exe sethc.exe.bak
    copy cmd.exe sethc.exe
           
    replace the sticky keys application
  5. Close all open windows. When system reboots, remove the install disk to avoid booting to the DVD again.
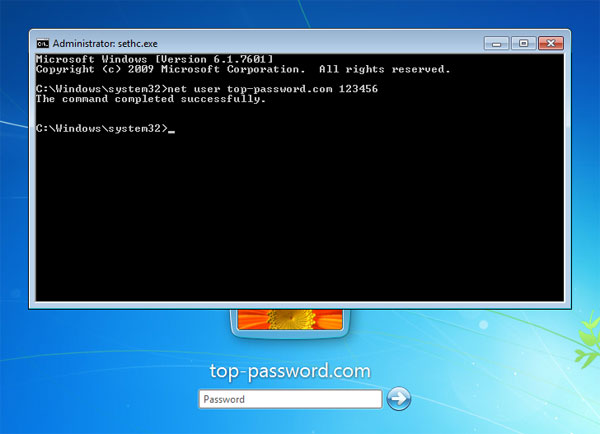
  6. At the login screen, press the SHIFT key 5 times and a fully privileged Command Prompt will open. Enter the following command to reset your forgotten password:
    net user user_name new_password
        
    reset Windows 7 password
  7. Close Command Prompt and you can now log in to Windows 7 with the new password.

Method 4: Reset Windows 7 Password with PCUnlocker

If you have neither a password reset disk nor a install disk, you can reset Windows 7 password with a simple yet powerful program - PCUnlocker. No matter if your admin password is forgotten, or the account is locked down or disabled, PCUnlocker lets you regain access to any user account with a pretty easy reset process.
  1. Use a spare PC to download PCUnlocker and save the zip archive to your desktop.
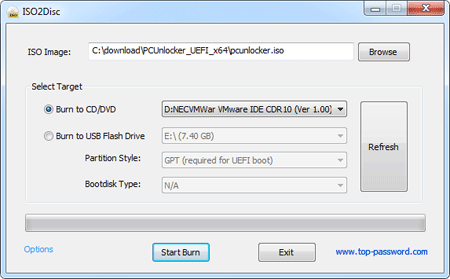
  2. Extract the archive and you will get an ISO file: pcunlocker.iso. Burn the ISO to a blank CD (or USB flash drive) using the freeware ISO2Disc or ImgBurn.
  3. Boot your locked Windows 7 computer from the CD. To do this, you might have to change the boot order in your PC's BIOS to boot from the optical drive first.
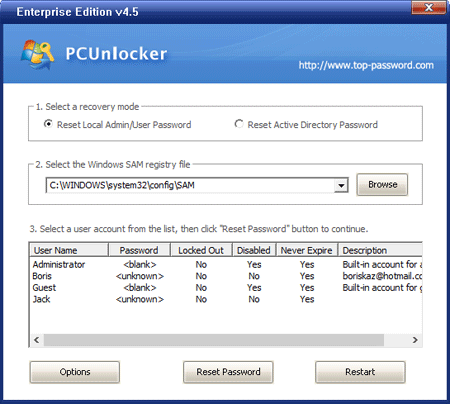
  4. Once booted to the PCUnlocker program, select your desired user account and click on Reset Password button. It will unlock / reset your lost Windows 7 password in no time.
    Reset Windows Password
  5. Reboot your computer and take out the CD, you can then get back into your account without password. It also recommends that you create a Windows 7 password reset disk from the Control Panel, just in case you lose access to your system again.

God Mode (Control Panel)-200+Settings One Place

God Mode (Control Panel)-200+Settings One Place In The Desktop create a New Folder Rename it as GodMode.{ED7BA470-8E54-465E-825C-99712043E01...